-
Corsair M65 RGB Elite Gaming Mouse Teardown - White Edition
Lunas RaWelcome humans to this teardown video (not a repair video) of one of my favourite gaming mice from Corsair, which also turned out to be a complete squeaking disaster. I have owned numerous products from this company, and prior to this mouse I had an M60 unit that outlasted this newer M65 by a long shot. However, hopefully in a new revision, Corsair will find a way to re-engineer this specific product line. Follow and support at: https://solo.to/lunas_ra The goal of this video: My goal was to tear down the unit to find out what exactly was causing the squeaking noise that came from the top button click areas, and also from both sides of the mouse. All of these parts were making a horrible sound a few weeks into ownership, and only got worse as time went on. I used it for about a year, and it spent months in the drawer, so I was planning on recycling it anyway. Was this video done for science: Yes, this was done for absolute gamer tech geek science. I'm not an engineer nor a repair specialist. I'm was just curious. Did I try to repair the mouse: No, I already assessed from the start, this was a frame or internal structural issue before even opening it. Since this was my first teardown of any gaming mouse, I decided not to fully take apart the laser housing. What caused the issue: Inside the top part of the mouse, there is another layer of plastic that is clipped into it, the rubbing between the parts, cause the noise, and because it was bare plastic to plastic, without anything in between, attached together by clips, there was no way of really fixing this issue. Also, on the sides, same issue of part grinding into other parts. All the parts on their own, were fine. But combined, cause the horrible squeaking noises.55 views -
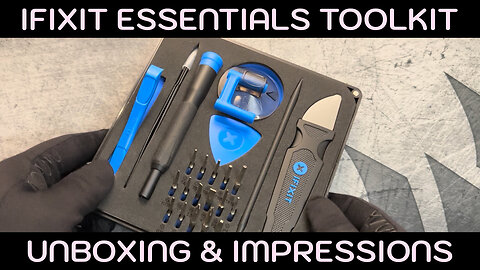
IFIXIT Essentials Electronics Repair Kit Unboxing & Impressions
Lunas RaFinally got an IFIXIT kit, well it's been sitting collecting dust for months now, but finally I'm building a new PC and it may actually come in handy, so I'm opening it and giving my impressions! #righttorepair #ifixit #repairs We don't sell coffee, we don't sell memberships, just follow and like if you appreciate this selfless time and effort to bring you videos! My socials are on: https://x.com/lunas_ra https://solo.to/lunas_ra69 views 1 comment -
Fixing Loose OLED Nintendo Switch JoyCons
Lunas RaMy Nintendo Switch OLED came with loose Joycons on both sides, but especially on the right side. This left much to be desired when taking it out of the house to play, especially with faster action games. After watching some videos, I realized their solution didn't work for my Switch as just fixing the issue slightly wasn't going to cut it for me. I wanted a solid feeling portable device, and so I decided to film it live and figure it out as I go (but do not worry, I made a lot of cuts to ensure you're not sitting around waiting for me to cut pieces of tape). Watch and enjoy the process! Let me know if you also had similar issues or found solutions that also work! My Goal: 1. Do not open anything up inside the Joycons or the Switch. 2. Only use quality Vinyl tape rated to 80 degrees Celcius that can be removed without leaving glue or marks as shown in some other videos I have seen. 3. The Joycons must slide out and not be completely jammed in to the solution. 4. If need be, the solution can be removed to return the Switch to its original state for re-selling, servicing, etc. The Result: 4 pieces of vinyl tape had to be placed in 3 places per side, with the bottom getting a second smaller piece taped over the first to allow the Joycon to better slide up and down without causing friction or catching on the edge of the tape (otherwise the tape would start to peel and cause headaches). Notes: I would not attempt this if you got kids. This makes the unit fairly rigid, and I believe Nintendo left some tolerance to ensure the unit is able to flex/bend without breaking especially when handled by kids. Post Video: I used a screw driver in my computer repair kit that was able to fit the Joycon to tighten the screws on it, as my right one was making noises when pressed a bit. That was outside the scope of the video as it was specific to the right Joycon only. The left one itself seemed fine. #nintendoswitch #nintendo #switcholed #joycons110 views