New Perspectives Access 2019 | Module 6: SAM Project 1a | Global Human Resources Consultants (2025)
Global Human Resources Consultants
WORKING WITH FORM AND REPORT CONTROLS
GETTING STARTED
• Open the file NP_AC19_6a_FirstLastName_1.accdb, available for download from the SAM website.
• Save the file as NP_AC19_6a_FirstLastName_2.accdb by changing the “1” to a “2”.
o If you do not see the .accdb file extension in the Save As dialog box, do not type it. The program will add the file extension for you automatically.
• To complete this SAM Project, you will also need to download and save the following data files from the SAM website onto your computer:
o Support_AC19_6a_Logo.jpg
• Open the _GradingInfoTable table and ensure that your first and last name is displayed as the first record in the table. If the table does not contain your name, delete the file and download a new copy from the SAM website.
PROJECT STEPS
1. You work in the software division of Global Human Resources Consultants (GHRC), which sells modular Human Resource (HR) software to large international companies. For high-level planning purposes, you have created an Access database to track new clients, the HR software modules they have purchased, and the lead consultant for each installation. In this project you will work with different form and report controls. You will also create a split form.
Create a split form from the Consultant table. Save the form with the name ConsultantSplit as shown in Figure 1, and then close it.
Figure 1: Final ConsultantSplit Form in Form View
2. Modify the ClientEntry form in Form Design View by completing the following:
a. Change the Record Source for the form to the ClientSortedByName query.
b. Change the tab order so that the ClientID field is in the first position in the Detail section.
Save the ClientEntry form.
3. With the ClientEntry form still open in Form Design View, notice that the records are now sorted by Client Name. Use the Combo Box Wizard to add a combo box using the following instructions:
a. Add the new combo box below the existing ProjectStart text box at approximately the 2" mark on the horizontal ruler.
b. Get the values for the combo box from another table.
c. Select the ConsultantID, FirstName, and LastName fields from the Consultant table for the combo box.
d. Sort the records by the LastName field in Ascending order.
e. Hide the key field, and do not adjust column widths.
f. Store the value in the ConsultantID field.
g. Enter Consultant as the label for the combo box.
h. Switch to Form View.
i. Use the new combo box to select Sharilyn Sipes as the Consultant for the first record (ClientID 15 Ainyx Steel).
Save and close the ClientEntry form.
4. Modify the ConsultantSalary form in Form Design View by completing the following:
a. Add a check box control below the Current Salary text box and at approximately the 1.5" mark on the horizontal ruler.
b. Modify the Control Source property of the check box to the ContractEmployee field.
c. Use Contract Employee? as the Caption of the accompany label. (Hint: If necessary, resize the label to make the caption fully visible.)
Save and view the form in Form View as shown in Figure 2, and then close the ConsultantSalary form.
Figure 2: Final ConsultantSalary Form in Form View
5. Modify the CountryEntry form in Form Design View by completing the following:
a. Select the four controls in the Detail section and apply a Stacked Layout to them.
b. Expand the Detail section to be about 3" tall.
c. Use the Subform Wizard to create a subform control using all of the fields from the Consultant table.
d. Show Consultant for each record in Country using CountryCode.
e. Use ConsultantsByCountry to name the subform
f. Position the subform just below the Country Name label at approximately the 0.5" mark on the horizontal ruler.
g. Save and view the CountryEntry form in Form View, and then navigate to the third record for Canada as shown in Figure 3.
Close the CountryEntry form.
Figure 3: Final CountryEntry Form with Subform in Form View
6. Modify the SoftwareComponents form in Design View by completing the following:
a. Add a new text box to the form and position it just below the Installation Fee label and text box at approximately the 1.5" mark on the horizontal ruler.
b. Use Monthly Fee as the Caption for the accompanying label. (Hint: If necessary, resize the label to make the caption fully visible.)
c. Use MonthlyFee as the Control Source property for the text box.
Save the SoftwareComponents form.
7. Modify the SoftwareComponents form in Form Design View by completing the following:
a. Right-align the text in the four labels in the Detail section.
b. Right-align the right edges of the four labels in the Detail section.
c. Add a rectangle control around the four controls that identify the fees: the Installation Fee label, InstallationFee text box, Monthly Fee label, and MonthlyFee text box.
Save the SoftwareComponents form.
8. With the SoftwareComponents form still open in Form Design View, insert the Support_AC19_6a_Logo.png logo image found in the default folder to be used as a logo. Save and view the form in Form View as shown in Figure 4, and then close the SoftwareComponents form
Figure 4: Final SoftwareComponents Form in Form View
9. Create a Multiple Items form based on the ClientSoftware table. View the form in Layout View, confirm that it matches Figure 5, and then save it, using ClientSoftwareMultiple as the name.
Figure 5: ClientSoftwareMultiple Form in Layout View
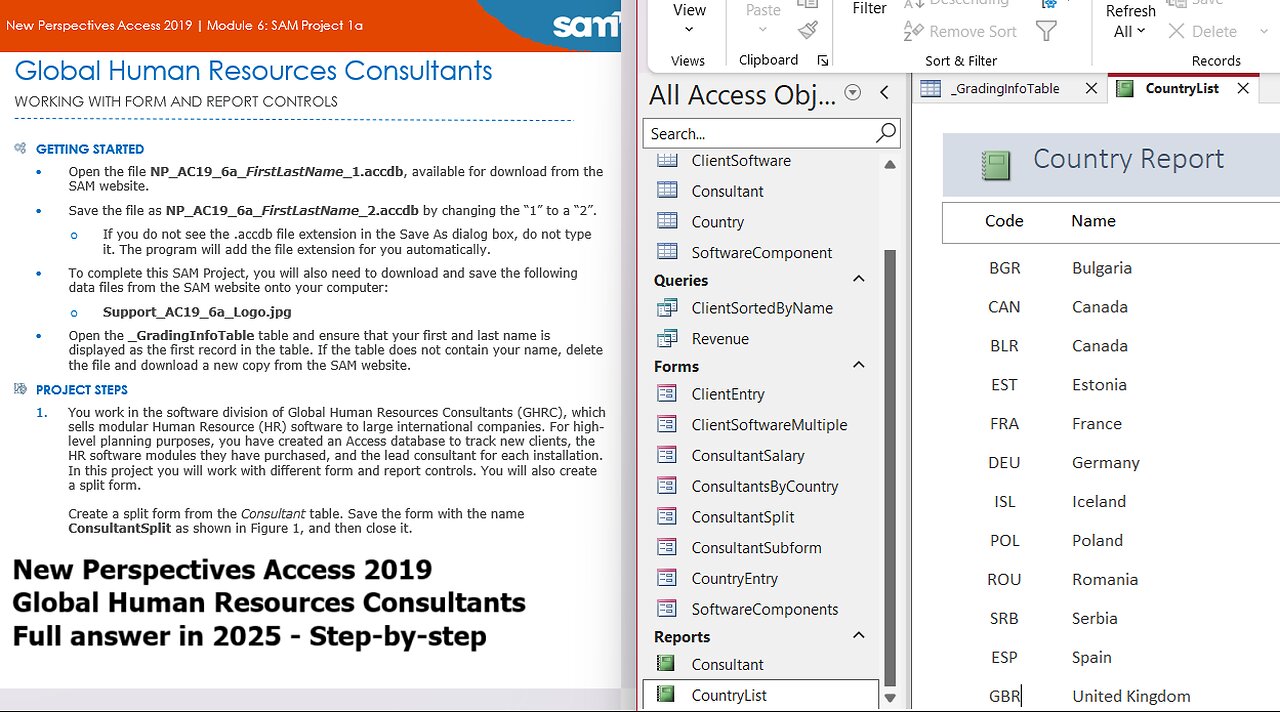
10. Modify the CountryList report in Design View by completing the following:
a. Add a rectangle control around the two labels in the Page Header section.
b. Change the shape fill of the rectangle control to transparent.
c. Add a horizontal line to the Report Footer section, just above the text box that calculates the count.
Save and view the CountryList report in Print Preview as shown in Figure 6 and then close the CountryList report.
Figure 6: Final CountryList Report in Print Preview
Save and close any open objects in your database. Compact and repair your database, close it, and then exit Access. Follow the directions on the SAM website to submit your completed project.
#NewPerspectives
#NewPerspectiveAccess
#MicrosoftAccess
#Microsoft
#MicrosoftOffice
#MicrosoftAccess2019
#GlobalHumanResourcesConsultants
-
 LIVE
LIVE
GritsGG
5 hours agoQuad Win Streaks!🫡 Most Wins in WORLD! 3600+
162 watching -
 LIVE
LIVE
Sarah Westall
2 hours agoCan the World Be This Strange? The Nature of Our Reality w/ Darius J Wright
244 watching -
 LIVE
LIVE
megimu32
2 hours agoOn The Subject: Friends | 31 Years of the Sitcom That Defined a Generation
128 watching -
 30:00
30:00
BEK TV
23 hours agoCounter Culture Mom
1.55K -
 1:24:54
Kim Iversen
5 hours agoTylenol vs Vaccines: Which One Is The REAL Cause Of Autism? The Truth Will Upset You
49.9K51 -
 LIVE
LIVE
GloryJean
3 hours ago2v2 Tuesday 🔥 Night Games w/ The Boys 🖱️ 6.7 K/D
10 watching -
 LIVE
LIVE
XxXAztecwarrior
5 hours agoNew Season/ War Ablaze
29 watching -
 LIVE
LIVE
Armadillofather
2 hours agoTime for some Borderlands Chaos! | Thank you for being here!
16 watching -
 1:03:39
TheCrucible
5 hours agoThe Extravaganza! EP: 41 (9/23/25)
275K18 -
 1:04:36
BonginoReport
5 hours agoSpineless Google Admits Caving To Biden Admin - Nightly Scroll w/ Hayley Caronia (Ep.140)
69.1K58