New Perspectives Access 2019 | Module 7: SAM Project 1a | Global Human Resources Consultants (2025)
Global Human Resources Consultants
MODIFYING ADVANCED REPORTS
GETTING STARTED
• Open the file NP_AC19_7a_FirstLastName_1.accdb, available for download from the SAM website.
• Save the file as NP_AC19_7a_FirstLastName_2.accdb by changing the “1” to a “2”.
o If you do not see the .accdb file extension in the Save As dialog box, do not type it. The program will add the file extension for you automatically.
• Open the _GradingInfoTable table and ensure that your first and last name is displayed as the first record in the table. If the table does not contain your name, delete the file and download a new copy from the SAM website.
PROJECT STEPS
1. You work in the software division of Global Human Resources Consultants (GHRC), which sells modular Human Resource (HR) software to large international companies. For high-level planning purposes, you have created an Access database to track new clients, the HR software modules they have purchased, and the lead consultant for each installation. In this project you will modify advanced reports.
Open the ConsultantSalaries report in Layout View and complete the following:
a. Add a title.
b. Modify the title to add a space between the words Consultant and Salaries.
c. Bold the title.
d. Center-align the ID label and the data in the first column that identifies the ConsultantID data.
Save and close the ConsultantSalaries report.
2. Open the ClientSoftwareGrouped report in Design View, and add a grouping level on the SoftwareCode field. Save and close the report.
3. Open the ConsultantList report in Design View and complete the following:
a. Use 2 as the number of columns.
b. Use a Down, then Across layout.
Save and open the ConsultantList report in Print Preview, and then close the ConsultantList report.
4. Open the CountryList report in Design View and complete the following:
a. Remove the control layouts from the controls in all the report sections.
b. Remove the Page Header and Page Footer sections and all controls in them.
c. Resize the Country Report label in the Report Header section so that the right edge reaches the 2" mark on the horizontal ruler.
Save the CountryList report.
5. With the CountryList report still open in Design View, complete the following:
a. Select all controls on the report and change the font color to Automatic (Black).
b. Set the Alternate Back Color to Alternate Row for the Detail section.
Save and view the CountryList report in Print Preview as shown in Figure 1, and then close the CountryList report.
Figure 1: Final CountryList Report in Print Preview
6. Create a new report in Design View using these options:
a. Apply the Record Source property to the Revenue query.
b. Add all of the fields from the field list to the top of the Detail section of the report at about the 2" mark on the horizontal ruler.
Save the report with the name RevenueInfo and close it.
7. In the Navigation Pane, copy the ClientListing report and paste it, using ClientDetails as the name.
8. Open the ClientDetails report in Design View and complete the following:
a. Delete the two text boxes in the Page Footer section.
b. Move the ClientID label in the Page Header section and ClientID text box in the Detail section slightly to the right so that the right edge is at the 3" mark on the horizontal ruler.
Save the ClientDetails report.
c. Use Client Details as the caption for the label in the Report Header section. If necessary, resize the label so that the caption is fully visible.
Save the ClientDetails Report.
9. While still working in Design View of the ClientDetails report, add a sort order to sort the records in ascending order by ClientName.
Save and preview the report, a portion of which is shown in Figure 2, and then close the ClientDetails report.
Figure 2: Final ClientDetails Report in Print Preview
10. Use the Label Wizard to create labels for consultant files based on the Consultant table as follows:
a. Select the Avery USA 5096 product number. Use the Arial font with a font size of 12, a Bold font weight, and Automatic (1st column, 6th row in the Basic Colors palette) text color.
b. On the first line of the label, insert the LastName field, followed by a comma and a space and the FirstName field.
c. On the second line of the label, insert the ConsultantID field.
d. On the third line of the label, insert the Reside field.
e. Sort the report by LastName.
Save the report, using ConsultantLabels as the name. Confirm that it matches Figure 3, and then save and close it. (Hint: If a message appears warning that not all information is displayed, click OK.)
Figure 3: ConsultantLabels Report in Print Preview
11. Open the SoftwareComponents report in Design View and then complete the following:
a. Add page numbers to the report using the Page N of M format positioned in the left side of the Page Footer.
b. Add the date (but not the time) to the report using the Medium Date (28-Feb-19) format.
Save the SoftwareComponents report.
12. With the SoftwareComponents report still open in Design View, complete the following:
a. Adjust the Report Footer section to be about 0.5" tall.
b. Add a text box to the right side of the Report Footer section directly below the MonthlyFee text box in the Detail section.
c. Within the text box, add an expression to sum the MonthlyFee field for the entire report.
d. Enter Total Monthly: as the caption for the new label in the Report Footer section. If necessary, resize the label so that the caption is fully visible.
Save the SoftwareComponents report.
13. With the SoftwareComponents report still open in Design View, complete the following:
a. Left-align the left edge of the new text box in the Report Footer section with the MonthlyFee text box in the Detail section.
b. Right-align the content within the MonthlyFee text box in the Detail section and also in the new text box in the Report Footer section.
c. Apply Currency format to the text box in the Report Footer section.
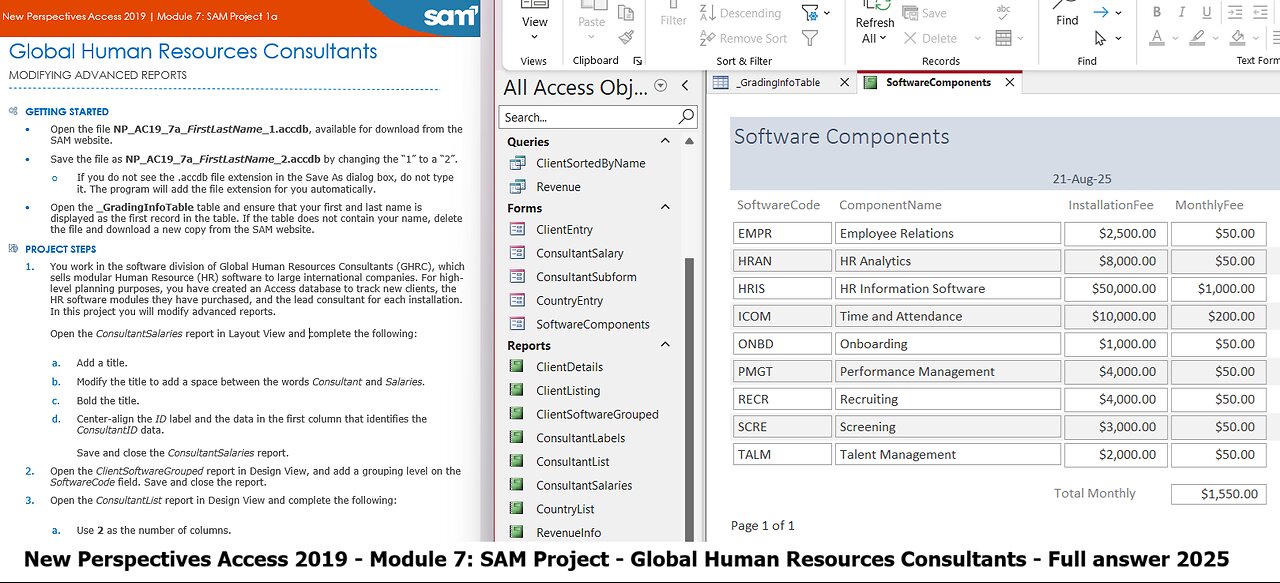
Save and preview the report in Print Preview as shown in Figure 4, and then save and close the SoftwareComponents report.
Figure 4: Final SoftwareComponents Report in Print Preview
Save and close any open objects in your database. Compact and repair your database, close it, and then exit Access. Follow the directions on the SAM website to submit your completed project.
#MicrosoftAccess
#Microsoft
#MicrosoftOffice
#Access
#NewPerspectivesAccess
#NewPerspectives
-
 2:49:26
Laura Loomer
6 hours agoEP145: Trump Makes BOMBSHELL Autism Announcement
40.2K18 -
 6:14:04
SpartakusLIVE
7 hours agoEXPLOSIVE $400+ 2v2 Tuesday has viewers GLUED to the screen
54.4K1 -
 3:19:06
GrimmHollywood
6 hours ago🔴LIVE • GRIMM'S TUESDAY FRIGHT NIGHT • STARRING GRIMM HOLLYWOOD • NO, I'M NOT HUMAN PART 1 •
34.5K2 -
 1:21:01
Flyover Conservatives
13 hours agoAI Encouraged Suicide: The Global Experiment on Our Kids - Joe Allen | FOC Show
46.7K4 -
 1:07:40
Glenn Greenwald
8 hours agoTucker Carlson on Charlie Kirk Assassination Fallout, Free Speech, Foreign Policy, and the Reaction to his Kirk Remarks | SYSTEM UPDATE #520
183K131 -
 14:22
14:22
Robbi On The Record
2 days ago $2.23 earnedGen Z’s Narcissism Obsession: Why Everyone’s a “Psychologist”
45.3K14 -
 8:15:08
GritsGG
9 hours agoQuad Win Streaks!🫡 Most Wins in WORLD! 3600+
62.5K2 -
 1:09:28
Sarah Westall
6 hours agoCan the World Be This Strange? The Nature of Our Reality w/ Darius J Wright
41.6K4 -
 1:58:20
megimu32
6 hours agoOn The Subject: Friends | 31 Years of the Sitcom That Defined a Generation
38.8K5 -
 30:00
30:00
BEK TV
1 day agoCounter Culture Mom
12.3K