Microsoft PowerPoint 2021 Chapter 1 Guided Project 1-2 - Full answer in 2025 Step-by-step
Solution Seekers, Inc., A Management
Consulting Firm, Is Preparing A Series
Of Brief Presentations To Be Used In A
Training Program For New Hires. For
This Project, You Develop A
Presentation About How To Get Better
Results When Writing Email Messages.
[Student Learning Outcomes 1.1, 1.2, 1.3, 1.6, 1.7, 1.8, 1.9]
Files Needed: E-mailResults-01.pptx (Available from the Start File link.), E-mailContent-01.pptx, At-Symbol-01.jpg
(Available from the Resources link.)
Completed Project File Name:[FirstName.LastName]-E-mailResults-01.pptx
Skills Covered in This Project
Open a presentation.
Change bullets.
Reuse slides from another presentation.
Rearrange slides.
Check spelling.
Insert a picture.
Use PowerPoint Designer to apply slide layouts.
Apply transitions.
Preview a presentation.
Change presentation properties.
Print a handout.
Save a presentation
This image appears when a project instruction has changed to accommodate an update to Microsoft
365 Apps. If the instruction does not match your version of Office, try using the alternate instruction instead.
Steps to complete This Project
1. Open and resave a presentation.
a. Click the File tab, select Open, and click Browse.
b. Locate and double-click E-mailResults-01 file to open the presentation. Click the Enable Editing button in the
Message Bar at the top of the presentation so you can modify it.
c. The file will be renamed automatically to include your name. Change the project file name if directed to do so by
your instructor. Press F12 (or Fn+F12 if necessary, for your computer) to open the Save As dialog box and save
this presentation.
2. Change the bullets for additional emphasis.
a. Display slide 2. Select the bulleted text.
b. Click the Bullets drop-down arrow [Home tab, Paragraph group].
c. Select Bullets and Numbering to open the Bullets and Numbering dialog box.
d. Change the Size to 80% of text.
e. Click the Color button and select Orange, Accent 6 (last color/first row) (Figure 1-109).
f. Click the Customize button to open the Symbol dialog box.
g. Scroll down the Font list and select Wingdings 3 (Figure 1-110).
h. Select the Black Right-Pointing Pointer (Character code 117).
i. Click OK to close the Symbol dialog box. Click OK again to close the
Bullets and Numbering dialog box.
3. Reuse slides from another presentation to follow slide 2, the current slide.
a. Click the New Slide drop-down arrow and select Reuse Slides.
b. Click Browse on the Reuse Slides pane to open the Browse dialog box.
Locate the resource files.
c. Select the presentation E-mailContent-01 downloaded from the
Resources link and click Open. This presentation has spelling errors that
you will correct later.
d. Verify that the "Use source formatting" or "Keep
source formatting" check box in the Reuse Slides pane
is not selected to keep the current presentation
formatting. Click all three slides on the Reuse Slides
pane to insert them (Figure 1-111).
e. Close the Reuse Slides pane.
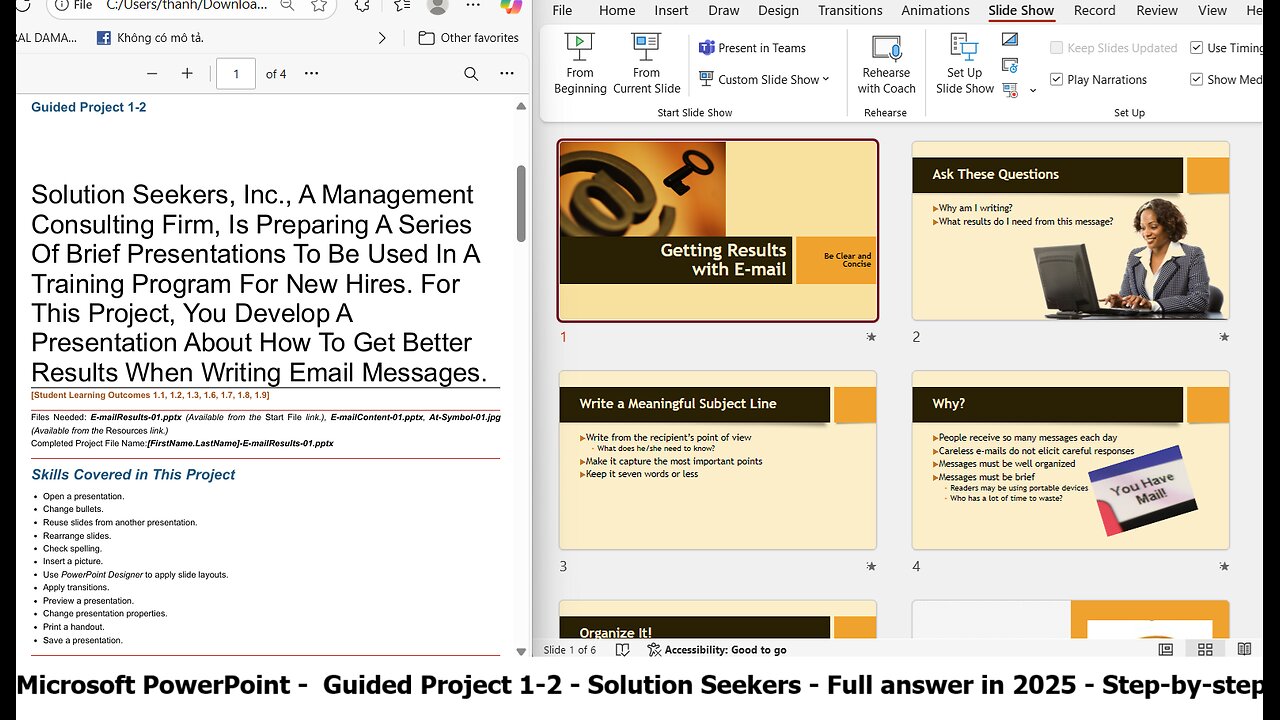
4. Use the Thumbnail pane to rearrange the six slides in
this order:
1 Getting Results with E-mail
2 Ask These Questions
3 Why?
4 Write a Meaningful Subject Line
5 Organize It!
6 Keep It Short
5. Select slide 1. Click the Spelling button [Review tab, Proofing group].
a. Correct all spelling errors: "receive," "Careless," "organized," "capture,"
"response," and "separate."
b. Click OK when the spell check is complete.
c. Close the Design Ideas pane if it opens.
6. Use Format Painter to change list bullets.
a. Display slide 2 and select the body placeholder with the bulleted text.
b. Double-click the Format Painter button [Home tab, Clipboard group] so
you can apply what you have copied more than one time.
c. Press Page Down and click the list on slide 3 to apply the change for
the first-level bullets.
d. Repeat for slides 4 and 5
Press Esc to end formatting or click the Format Painter button again. Changing bullets for all slides could also
be accomplished using the Slide Master.
7. Insert a picture and apply a Design Ideas layout if available.
a. Select slide 6 and delete the picture on the right.
b. Click the Insert tab, and then click the Pictures button. Choose This Device in the drop down list.
Click the Insert tab, and then click the Pictures button.
c. Browse to the resources files downloaded from the Resources link.
d. Select At-Symbol-01, then click Insert. Depending on your version of PowerPoint, the Design Ideas pane will
open.
#microsoftoffice
#MicrosoftPowerPoint
#PowerPoint
#SIMNet
#GuidedProject
-
 5:21:52
Rallied
6 hours ago $3.56 earnedWarzone Challenges All Night
31.2K2 -
 2:45:52
DLDAfterDark
8 hours ago $12.50 earnedWhat Are We Missing From The Charlie Kirk Incident? Feat. TN Tactical - After Hours Armory Live!
36.5K8 -
 16:23
16:23
True Crime | Unsolved Cases | Mysterious Stories
1 month ago $4.81 earnedThe Strange Disappearance of Mekayla Bali | (Mini-Documentary)
32.9K5 -
 10:03
10:03
nospeedlimitgermany
13 days ago $8.15 earnedVW Golf 5 R32 | 250 PS | Top Speed Drive German Autobahn No Speed Limit POV
36.4K6 -
 1:35
1:35
Memology 101
1 day ago $6.09 earnedChicago Mayor Johnson calls LAW ENFORCEMENT a "SICKNESS" he will "ERADICATE"
35.9K41 -
 10:17
10:17
Advanced Level Diagnostics
13 days ago $6.63 earned2007 Chevy Express - Replaced Everything But The Code Remains!
40.4K -
 1:01:11
The Mel K Show
8 hours agoMel K & Harley Schlanger | History Repeats: A Wake-Up Call for Humanity | 9-20-25
103K29 -
 2:13:52
Mally_Mouse
17 hours ago🌶️ 🥵Spicy BITE Saturday!! 🥵🌶️- Let's Play: Lockdown Protocol (New Updates!)
97.6K6 -
 12:57
12:57
Culture Apothecary with Alex Clark
1 day agoMy Last 6 Years With Charlie Kirk | In Memoriam with Alex Clark
44.1K10 -
 2:48:55
Barry Cunningham
13 hours agoPRESIDENT TRUMP WILL ENSURE THAT CHARLIE KIRK DID NOT DIE IN VAIN!
79K130