PowerPoint 2021 Ch 2 Guided Project 2-3 - Solution Seekers, Inc. - Full answer in 2025 Step-by-step
Apply text effects.
Convert text to a SmartArt graphic.
Apply a SmartArt style and effects.
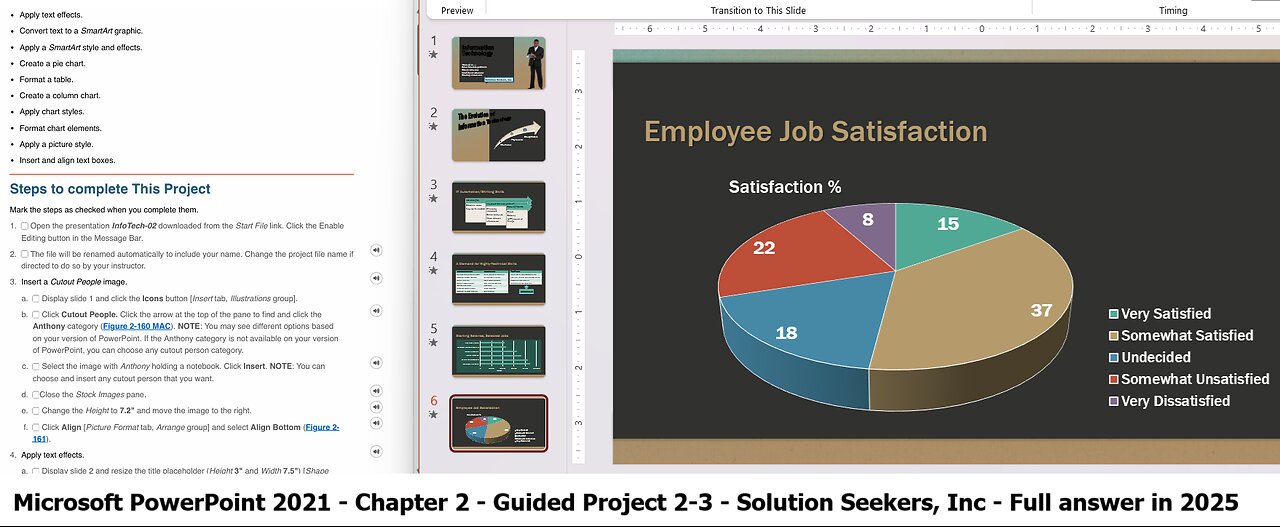
Create a pie chart.
Format a table.
Create a column chart.
Apply chart styles.
Format chart elements.
Apply a picture style.
Insert and align text boxes.
Steps to complete This Project
Mark the steps as checked when you complete them.
1.
2.
Open the presentation InfoTech-02 downloaded from the Start File link. Click the Enable
Editing button in the Message Bar.
The file will be renamed automatically to include your name. Change the project file name if
directed to do so by your instructor.
3. Insert a Cutout People image.
a. Display slide 1 and click the Icons button [Insert tab, Illustrations group].
b.
c.
d.
e.
f.
Click Cutout People. Click the arrow at the top of the pane to find and click the
Anthony category (
Figure 2-160 MAC). NOTE: You may see different options based
on your version of PowerPoint. If the Anthony category is not available on your version
of PowerPoint, you can choose any cutout person category.
Select the image with Anthony holding a notebook. Click Insert. NOTE: You can
choose and insert any cutout person that you want.
Close the Stock Images pane.
Change the Height to 7.2" and move the image to the right.
Click Align [Picture Format tab, Arrange group] and select Align Bottom (
161).
4. Apply text effects.
a. Display slide 2 and resize the title placeholder (Height 3" and Width 7.5") [Shape
Format tab, Size group].
he text should fit on two lines.
Select the
three arrows
and click the
Text Fill drop
down arrow
[Format tab,
WordArt Styles
group].
Select
Black,
Background 2
(third color/first
row) (
Figure 2
163).
6. Modify table
formatting.
a. Display slide
4 and select
the two-column
table on the
left.
b.
c.
Verify that
Header Row
and Banded
Rows [Table
Design tab,
Table Style
Options group]
are selected.
Figure 2-161 Cutout People image on slide 1
Figure 2-162 Slide 2 text effects applied
Click the
More button [Table Design tab, Table Styles group] to open the Style gallery.
d.
e.
f.
Apply the Medium Style 2, Accent 1 style (second color/seventh row) [Table Design
tab, Table Styles group].
Select the first row, click the Text Fill button, and select Black, Background 2 (third
color/
f
irst row).
Repeat steps 6 b–e for the single-column table on the right
Select the title placeholder and click
the Text Effects button [Shape Format
tab, WordArt Styles group].
c.
d.
e.
f.
g.
Select Transform and click Cascade
Up (third option/last row).
Click the Text Fill drop-down arrow
[Shape Format tab, WordArt Styles
group] and select Teal, Accent 1,
Darker 25% (fifth color/fifth row).
Click the Text Outline button [Shape
Format tab, WordArt Styles group] and
select Black, Background 2 (third
color/first row).
Position the title in the upper left
corner (
Figure
2-162).
Delete the subtitle placeholder.
5. Convert bulleted text to a SmartArt graphic
and modify the style and colors.
a. Display slide 3. Select the bulleted
text and click the Convert to SmartArt
button [Home tab, Paragraph group].
Select the first SmartArt layout in the
gallery.
b.
c.
With the SmartArt still selected, click
the More button [SmartArt Design tab,
Layouts group] to open the gallery.
Figure 2-160 MAC Cutout People,
Anthony category
Scroll to the Process type and select the Increasing Arrows Process layout (fifth
option/second row).
d.
e.
f.
g.
The SmartArt changes to the new layout.
Apply the Cartoon style from the 3-D group [SmartArt Design tab, SmartArt Styles
group].
Select the three white shapes and click the Shape Fill drop-down arrow [Format tab,
Shape Styles group].
Select Tan, Text 2, Lighter 60% (fourth color/third row) to soften the color
#MicrosoftOffice
#MicrosoftPowerPoint
#PowerPoint
#GuidedProject
#SolutionSeekers
-
 LIVE
LIVE
The Shannon Joy Show
1 hour agoFinal Betrayal: Trump’s FBI Director Kash Patel Declares Jeffrey Epstein WASN’T A Sex Trafficker.
568 watching -
 LIVE
LIVE
The Mel K Show
1 hour agoMORNINGS WITH MEL K - Who Benefits? Order Out of Chaos & the Hegelian Dialectic 9-17-25
453 watching -
 LIVE
LIVE
Grant Stinchfield
55 minutes agoBombshell Audio Proves FBI Targeted Navarro for One Reason—Politics
104 watching -
 LIVE
LIVE
LFA TV
6 hours agoLFA TV ALL DAY STREAM - WEDNESDAY 9/17/25
4,612 watching -
 1:02:21
VINCE
3 hours agoThe Left's Lawfare Onslaught REVEALED | Episode 127 - 09/17/25
180K142 -
 59:53
59:53
The Rubin Report
1 hour agoCNN Reporter Humiliated as Question for Ted Cruz Blew Up in Her Face
15K13 -
 1:31:19
Nikko Ortiz
2 hours agoLIVE - Alleged Charlie Kirk Assassin UPDATE
16K3 -
 LIVE
LIVE
Benny Johnson
2 hours agoKash Patel Testifying LIVE Now on Charlie Kirk Murder, Assassin 'STAGED' Texts With Trans Boyfriend?
6,715 watching -
 LIVE
LIVE
Caleb Hammer
4 hours agoThis Has Never Happened Before | Financial Audit
96 watching -
 11:33
11:33
China Uncensored
1 hour agoChina's Reaction to Charlie Kirk Isn't What You'd Expect
6.48K4